Ice Dam Protection Starts Before the Next Snowfall
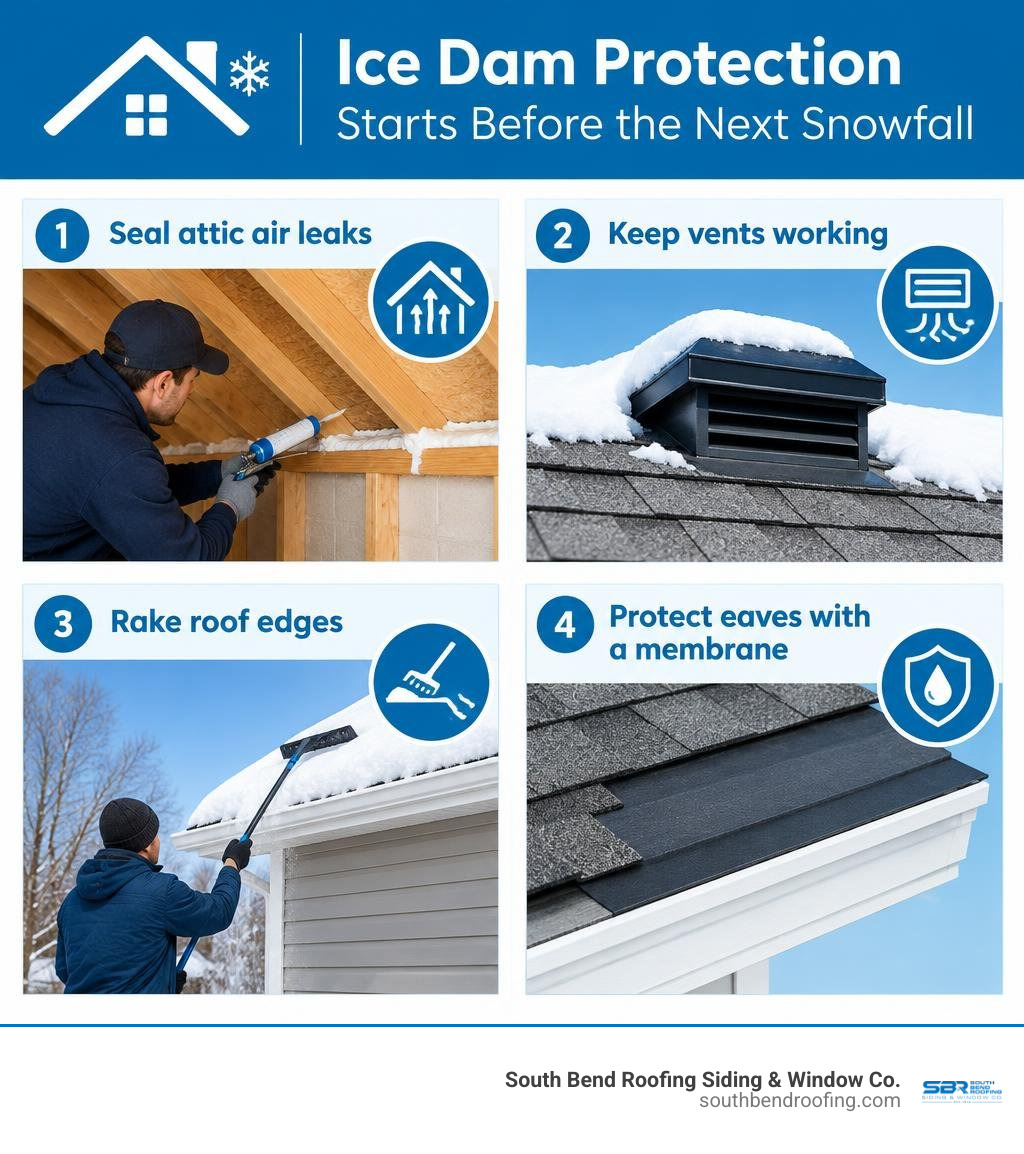
The best ice dam protection starts with keeping heat from reaching the roof: seal air leaks into the attic and make sure attic vents are working. After heavy snow, use a roof rake from the ground to clear the roof edge. When the roof is replaced, ask your roofer about an ice and water shield beneath the shingles at the eaves. It helps stop backed-up water from reaching the home, but it does not prevent an ice dam from forming.
I’m James Spillman, vice president at South Bend Roofing Siding & Window Co., which has served the region since 1914. I bring our team’s Indiana and Michigan roofing experience to this guide to help you choose practical ice dam protection.
How Ice Dams Form and the Structural Damage They Cause
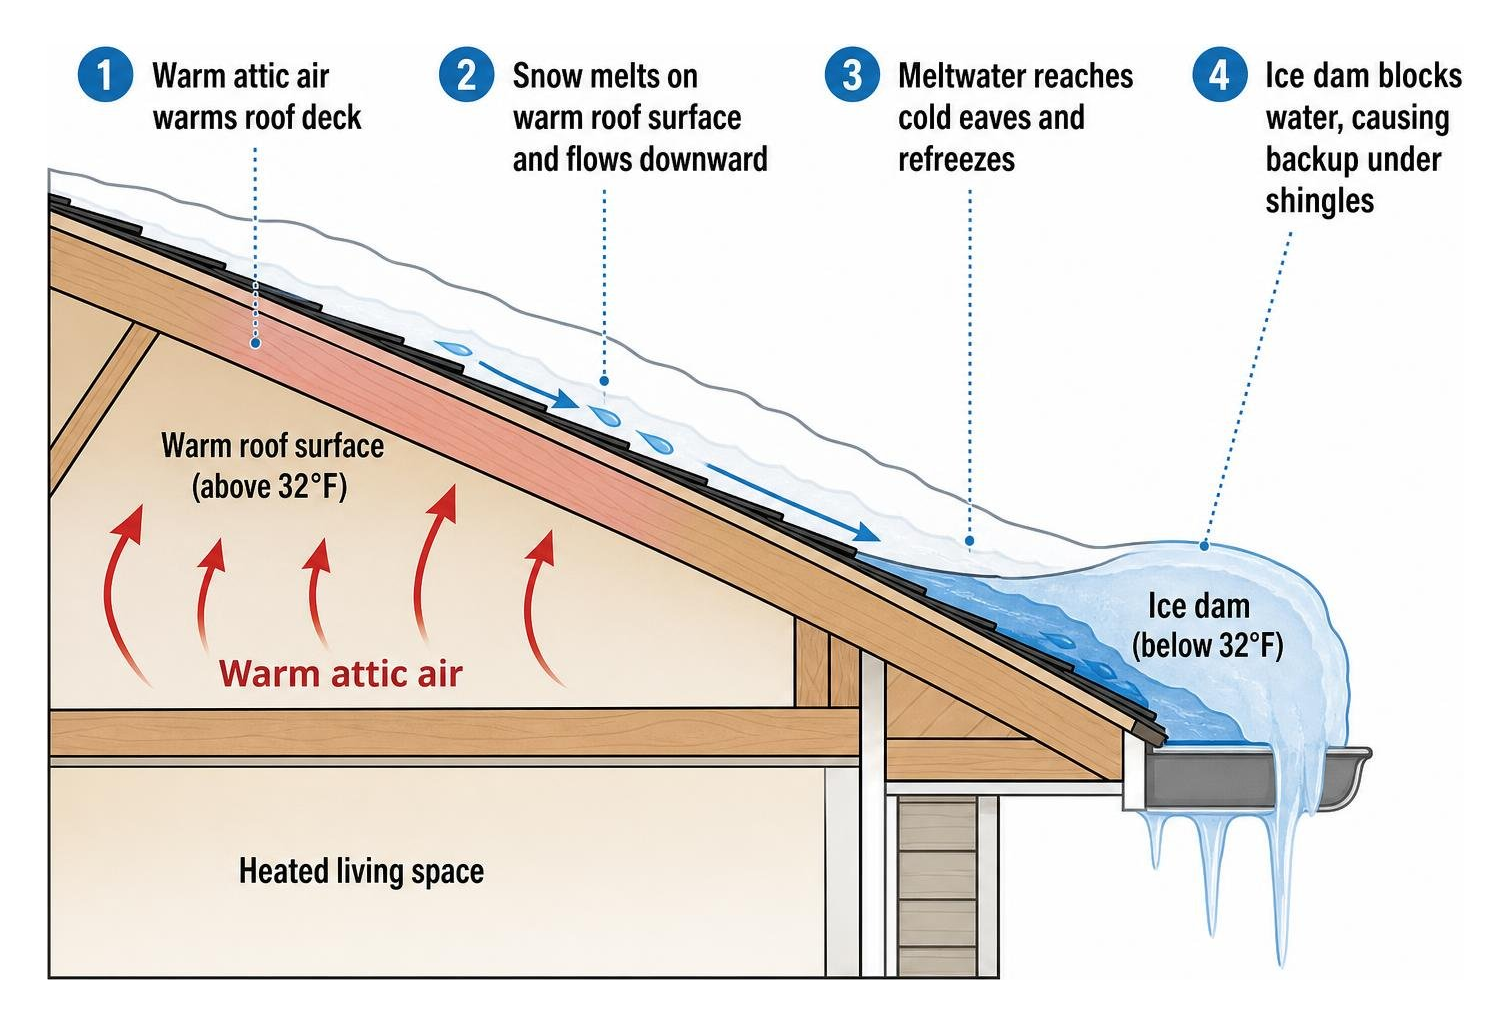
Winter in the Midwest brings picturesque snowfalls, but it also creates severe freeze-thaw cycles that threaten your roof system. An ice dam forms when warm air escapes from the heated living space into the attic, warming the underside of the roof deck. When the roof surface rises above 32°F, snow on the upper portions of the roof melts and runs downward as liquid runoff.
Once that meltwater reaches the unheated roof eaves and overhangs—which remain below 32°F because they extend beyond the home's exterior walls—it refreezes. Layer upon layer of freezing runoff accumulates, forming a literal dam of ice. As additional snow melts higher up, the water pools behind this frozen barrier. Because asphalt shingles are designed to shed water running downward rather than hold standing pools, trapped water forces its way under the shingles and through the roof sheathing.
The structural stress caused by this buildup is significant. One inch of solid ice weighs roughly the same as one foot of snow, meaning a large ice dam can add hundreds of pounds of concentrated weight to your eaves. When you combine heavy snowfall with deep ice, the total load can stress rafters and roof trusses to their structural limits. According to the commercial risk bulletin on winter weather hazards, severe winter weather and snow-load complications contribute to billions of dollars in property damage every year across the country.
Left unaddressed, the water trapped behind an ice dam can cause extensive issues:
- Water Infiltration: Meltwater penetrates beneath shingles, rotting the wooden decking and underlying rafters.
- Interior Damage: Water travels down interior wall cavities, ruining drywall, peeling paint, staining ceilings, and damaging electrical fixtures.
- Mold and Mildew Growth: Persistent moisture trapped inside wall cavities creates an ideal environment for mold spores, creating potential health risks for your family.
- Exterior Strain: The extreme weight pulls at roof edges, damaging shingles and warping exterior fascia boards.
Building Codes and Standards for Ice Dam Protection
Building codes establish mandatory structural standards to protect homes from seasonal water intrusion. The International Residential Code (IRC), specifically section R905.1.2, mandates the installation of an ice barrier on roofs in geographic areas that have a history of ice damming.
According to building code requirements for ice dam protection, this barrier must consist of a self-adhering polymer-modified bitumen sheet or an approved equivalent. The code specifies that the barrier must extend from the lowest roof edge to a point at least 24 inches inside the interior line of the exterior wall. For steeper roofs—such as those with an 8:12 pitch or greater—the barrier must extend at least 36 inches along the slope from the eave edge to account for steep runoff geometry.
Proper deck preparation is critical for code compliance. The roof deck must be completely dry, clean, and free of dirt, old fasteners, and debris so the self-adhering membrane can create a continuous, watertight seal directly against the wood.
Self-Adhering Membranes for Ice Dam Protection
Self-adhering membranes serve as the primary defensive barrier beneath your shingles. These membranes must meet strict manufacturing guidelines, specifically the ASTM D1970 standard for self-adhered polymer-modified bitumen sheets.
Unlike standard asphalt-saturated felt or synthetic underlayments that are mechanically fastened with nails or staples, self-adhering membranes feature a rubberized asphalt compound that bonds directly to the roof deck. The elastic properties of the polymer-modified bitumen allow the membrane to self-seal tightly around nails driven through it during shingle installation, preventing water from seeping through fastener penetrations.
| Feature | Standard Self-Adhering Membrane | High-Temperature Membrane |
|---|---|---|
| Primary Material | Polymer-modified bitumen | High-temp rubberized asphalt / butyl |
| Standard Compliance | ASTM D1970 | ASTM D1970 |
| Typical Heat Rating | Up to 200°F – 240°F | 250°F – 300°F+ |
| Best Application | Asphalt shingle roofing | Standing seam metal roofs & hot climates |
| Substrate Bond | Clean plywood / OSB decking | Plywood, OSB, and metal substrates |
As detailed in the ARMA guidelines for self-adhering underlayments, these membranes provide vital protection when applied in critical vulnerable areas such as valleys, around chimneys, along sidewalls, and at roof penetrations like plumbing vents and skylights.
Avoiding Common Underlayment Installation Mistakes
Installing an ice and water protection membrane requires precision. Common mistakes during the installation process can compromise the roof’s weatherproofing capability:
- Applying Over Dirty or Wet Decking: The membrane must form a direct chemical bond with the wooden roof deck. Dust, sawdust, moisture, or frost prevents proper adhesion.
- Inadequate Overlaps: Side laps between membrane rolls must be at least 3.5 inches, and end laps must measure at least 6 inches to prevent water migration between sheets.
- Installing in Cold Temperatures Without Proper Techniques: Most self-adhering membranes require an ambient and substrate temperature of at least 40°F to bond correctly. Following cold weather shingle installation guidelines ensures that shingles and underlying membranes are handled safely to avoid cracking, with hand-sealing applied to shingles when cold weather prevents automatic thermal bonding.
- Shortchanging Eave Coverage: Stopping the membrane at the exterior wall line rather than extending it the required 24 inches inside the interior wall line leaves the warm ceiling area vulnerable to leaks.
When a roof is severely damaged by seasonal weather, investing in professional roof replacement and tear-offs ensures that old, compromised materials are completely removed down to the decking so the roof structure can be thoroughly inspected and waterproofed.
Proactive Roof Defense and Prevention Strategies
While protective membranes prevent backed-up water from entering the home, stopping the formation of ice dams requires managing the temperature of your roof deck. The goal is to keep the entire roof surface cold and uniformly below freezing during winter weather.
- Attic Air Sealing: Seal attic bypasses where warm household air leaks into the attic. Common leakage areas include unsealed attic access hatches, open drywall seams, electrical wire penetrations, plumbing vent pipes, and recessed light fixtures. Sealing these gaps stops convective heat transfer.
- Balanced Attic Ventilation: A continuous, balanced ventilation system consisting of soffit intake vents and ridge exhaust vents allows cold outdoor air to sweep through the underside of the roof deck. This continuous airflow carries away any residual heat and moisture, maintaining a cold roof surface.
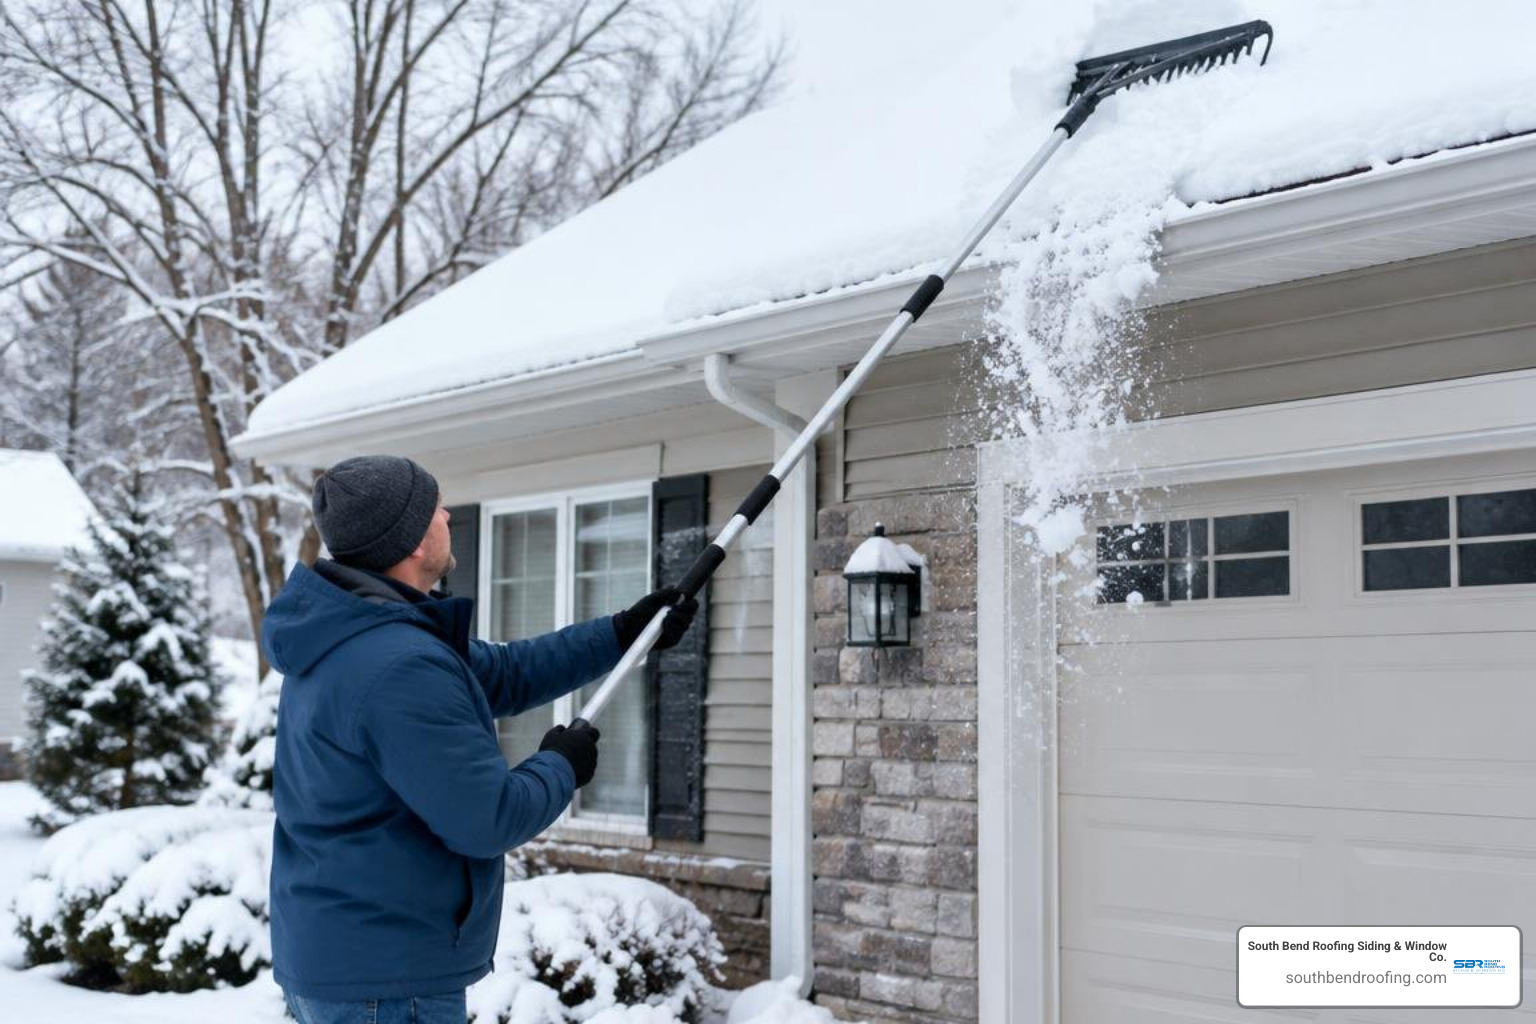
- Safe Snow Removal: After a heavy snowfall, use an expandable aluminum roof rake from the ground to clear the lower 3 to 4 feet of snow from your roof eaves. Removing the snow source prevents meltwater from feeding into an ice dam.
Pairing proactive snow management with residential roofing services keeps your home secure throughout demanding winter seasons.
Safe Emergency Ice Dam Protection and Removal Methods
If an ice dam has already formed and water is leaking into your home, fast action is required to prevent major interior damage. Never use a hammer, axe, chisel, or pick to smash ice off your roof; these tools will crack and tear frozen, brittle asphalt shingles, causing permanent damage to your roof deck.
- Create Drainage Channels: You can create temporary melt channels across the ice dam to allow trapped water behind it to drain away. Filling long pantyhose or fabric sleeves with calcium chloride and laying them perpendicular across the dam creates a gradual melt channel through the ice barrier. Never use rock salt (sodium chloride), as it corrodes metal flashings and harms exterior surfaces.
- Low-Pressure Steam Removal: The safest professional method for removing an established ice dam is commercial low-pressure steam equipment. High-temperature, low-pressure steam cuts through thick ice quickly without abrasive force or high pressure that could strip the ceramic granules from your shingles.
When sudden winter leaks threaten your home's interior, contacting our team for 24-hour emergency roof repair can quickly resolve leaks and protect your living space.
Frequently Asked Questions About Ice Dams
Does Homeowners Insurance Cover Ice Dam Damage?
Most standard homeowners insurance policies cover sudden and accidental interior water damage caused by ice dams, including repairs to stained ceilings, damaged drywall, and affected structural framing. However, policies typically do not cover the cost of removing the ice dam itself or repairing pre-existing roof maintenance neglect. Always document any water damage with clear photographs and check with your insurance provider regarding your specific policy coverage.
Can Ice and Water Shield Be Installed Over Existing Shingles?
No. Self-adhering ice and water protection membranes must never be installed directly over existing asphalt shingles. The membrane requires a clean, flat, and solid wooden roof deck to adhere properly and create a watertight seal around nail penetrations. Installing a membrane over shingles creates air pockets, prevents bonding, and violates manufacturer installation specifications and building code standards.
What Roof Pitch Is Most Prone to Ice Damming?
Roofs with low slopes (such as 2:12 to 4:12 pitches) and moderate slopes (4:12 to 6:12 pitches) are particularly vulnerable to ice damming because meltwater drains more slowly across lower inclines, allowing it to pool and freeze readily at the cold eaves. While steep-pitch roofs (8:12 and higher) shed water faster, they can still experience ice dams if attic air leaks and heat loss warm the upper decking, causing runoff to freeze along deep overhangs.
Conclusion
Ice dams are a serious winter challenge across Indiana and Michigan, but understanding how they form and taking proactive steps can keep your home safe, dry, and protected. Whether addressing an active leak, repairing seasonal wear, or planning a full roof upgrade, reliable craftsmanship is essential to long-term roof durability.
At South Bend Roofing Siding & Window Co., we have provided dependable residential and commercial roofing solutions since 1914. Backed by 110+ years of regional roofing experience, our certified installation team delivers comprehensive roof replacements, accurate leak repairs, and full tear-offs down to the deck. We proudly serve homeowners across South Bend, Mishawaka, Elkhart, La Porte, Goshen, and Niles, as well as commercial clients throughout Indiana and Michigan. Every project is backed by manufacturer warranty coverage plus our own Workmanship Warranty.
Whenever a repair can safely extend the working life of your roof, we provide honest recommendations without pushing for unnecessary replacements. Contact South Bend Roofing Siding & Window Co. today by visiting our trusted local roofing solutions page or calling us directly at (574) 288-4764 to schedule your free roof inspection and written estimate.